Forms / Downloads
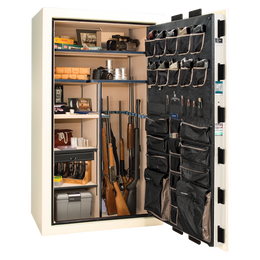
Choosing a Location
- For optimum security, position your safe where it is not visible from windows or normal traffic areas. In addition, it is recommended that you position your safe away from exterior doors and windows.
- For optimum fire protection, place your safe in the basement or lowest level of your home, against an outside wall. We recommend that you place your safe away from areas where a fire is likely to start or burn exceptionally hot.
- If you have purchased a large safe (1,000 lbs. or more) or if you live in an older home, it is recommended that you install the safe near a load-bearing wall.
- To maintain the 5-year warranty for painted surfaces, you must install the safe in an enclosed, climate-controlled environment (i.e. with conditioned air preventing wide temperature fluctuations). The safe must not be exposed to weather or excessive humidity.
- The bottom surface of your safe is primed, but not painted. It is recommended that you place a moisture barrier between the safe and the floor to protect the bottom of the safe against rust. A scrap piece of carpeting is an excellent barrier.
Remove Safe from Pallet
- Lift the access panels on the sides of the floor.
- Remove the mounting bolts using the appropriate socket and ratchet (typically 9/16").
- Use caution and have another person steady the safe while removing the bolts, to protect against the safe tipping forward with the door open after the bolts are removed.
- After unbolting the safe, close the safe door and lock the safe. Carefully slide the safe off of the pallet and into the desired location. Use caution to avoid scratching or damaging floor surfaces.
Anchoring the Safe to the Floor
- Anchoring kits are the #1 security add-on for safes. Available for both wood and concrete floors.
- For optimum security, the safe should be anchored to the floor utilizing pre-drilled holes in the bottom of the safe floor (under fabric/floor panels). These pre-drilled holes are the same holes used to lag bolt the safe to the shipping pallet. In order to lag bolt to the floor, shipping pallet should be removed.
- Decide where the safe is to be installed. If location of safe is to be placed directly on cement, place some type of barrier (carpet remnant) under safe before installing as this will protect the bottom of the safe from scratches and potential rust.
- Once safe is in the desired location, ensure that the safe is level on the floor and use shims to level if needed. You can tell if a safe is level by opening the door and seeing if the door stays in its open position. If the door automatically opens or closes, shim sides accordingly.
- Once safe is level, open door and lift the access panels on the safe floor.
- The anchoring kit includes the hardware and instructions for anchoring the safe to either wood and concrete floors. Additional tools are required for installation. (See instructions by clicking on the links below.)
- Follow the instructions provided with the safe anchoring kits shown below.
Door Adjustment
Liberty Safe installs packing material in the door to help protect it during shiping. Once removed the door may have some play in it, and may need to be tightened. Liberty installs two door adjusters on the inside left door jam allowing you to tighten the door.
Once adjusted the door should fit snuggly but allow the handle to turn and engage the bolts without significant resistance.
You can adjust your door by using the following steps.
- Locate the 3/16-inch hex key in your stock envelope.
- Open the safe door and remove the small pieces of shipping foam in the door. Close the safe door and check for how much play there is in the door by pulling on the handle back and forth. This will determine how much you will need to tighten the door.
- If the door has some play in it, start by adjusting the top door adjuster first. Using the hex key wrench loosen both screws approximately one full rotation.
- Slide out the curved nylon door adjuster approximately the amount of play in the door, and retighten the screws.
- Before adjusting the bottom door adjuster, check the door to see how snug it is. Close the door and pull on the handle again. If it is still loose you will need to repeat the same procedure and pull out the door adjuster even further.
- Once the handle turns smoothly and the door feels snug, complete the process by adjusting the bottom door adjuster by the same amount as the top.
- If by chance you have pulled out the door adjuster too far, the door bolts may end up so tight against the door adjusters that the slip clutch in the handle activates and the door bolts won't retract.
- If this happens use your knee, or shoulder, to put pressure on the left side of the door which helps take pressure of the bolts and the door adjusters. While pushing on the door, turn the handle and the door bolts should release.
- Loosen the door adjusters and retighten.
- Test to confirm door is snug and bolts engage without significant resistance.
Exterior Finish
Painted surfaces of the safe are covered under our warranty for 5 years. To maintain the warranty for painted surfaces, the safe must be stored properly, in a climate-controlled environment. For proper gun safe maintenance, don't expose the safe to weather or extreme humidity.
Hardware items (i.e. handle, lock dial and ring, hinge caps, etc.) are plated and include a protective coating to help prevent tarnishing.
Painted surfaces, including painted logos and silkscreens, and hardware should be maintained as follows:
- Clean painted surfaces with water only, using a clean, soft cloth.
- Wipe logos and silkscreens gently. Do not rub or polish logos or silkscreens.
- Clean hardware with water only, using a clean, soft cloth. Do not use metal polishes or solvents on plated hardware surfaces.
Liberty Safe Consumer Service
Contact your authorized dealer or Liberty Safe's Consumer Service department, for assistance with product use and care, ordering accessories or other issues.
If you have any questions or comments, please contact us.
VIEW OUR SPECIALS Which Safe is Right For You? TAKE THE QUIZ